• ScoroncocoloTechPages

Scoroncocolo's News and Reviews

~ News, Opinions, Tech News and Reviews

Scoroncocolo's News and Reviews

Monthly Archives: March 2015

How to Hide Files and Folders on a Mac

22 Sunday Mar 2015

Posted by scoroncocolo in Uncategorized

≈ Leave a comment

In the last post I wrote about how to encrypt files and folders on a Mac in order to be able to password protect them. In this post I want to talk about where might be the best place to hide them first of all and finally I want to show you how to make them disappear entirely.

Hiding Files in the Library Folder

Your Mac’c Library folder is similar to the Registry in Windows and is hidden by default. It’s hidden so that people are less likely to move, delete or deface system files but otherwise it is just like any other folder in OS X so you can certainly add other folders and files there. So as long as you are careful, it’s fairly good place to hide some secret stuff.

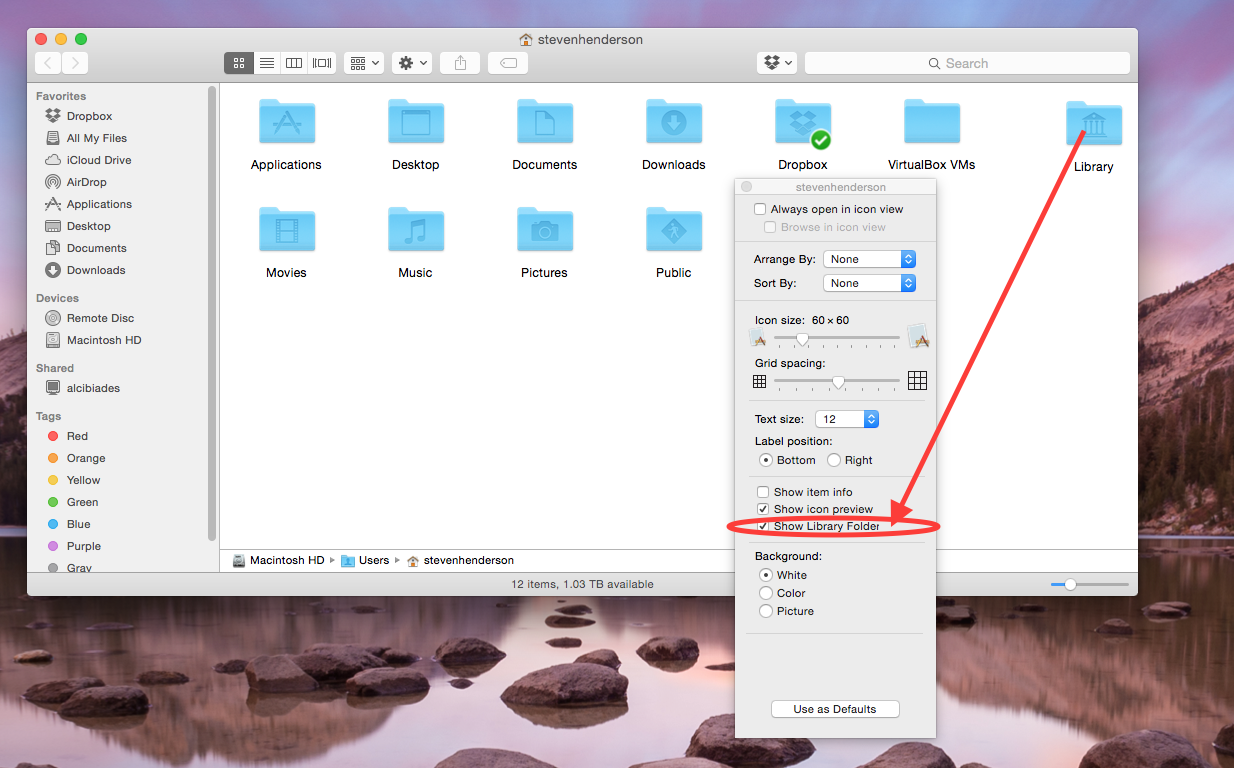
To find the Library folder in Mavericks and Yosemite, go to your Home folder in Finder (Shift + Cmd + H) or look for Home in Finder’s Go tab in the Finder menu bar. When in your Home Folder click View then click Show View Options or type (Cmd + J). When the View Options window opens, you’ll see a box at the bottom you can check to Show Library Folder. See below illustration. Enable that and your Library Folder appears. Now you can double-click it open and start dragging your secret stuff into it.

HideFiles inLibrary

Another way to get to the Library Folder is to hold down the Option Key while clicking the Go tab in Finders. This will give you the option to click open your Library Folder whether you have it hidden in your Home Folder or not.

It’s perfectly safe to add all the stuff you want to the Library Folder just don’t alter or delete anything that’s already there . When you’re done you can make the Library Folder hidden again by un-checking the Show Library Folder box.

The Most Secure Way to Hide Stuff on a Mac

While the above method of hiding files on a Mac might be geeky enough to secure things from your snoopy little brother, most tech savvy snoops could possibly find your secret stash if you tried to hid it in the OS X Library Folder so here’s a far more secure way to secret stuff on a Mac

In fact, it’s a way to hid folders and files on your Mac that is so secure that even Edward Snowden couldn’t find them. Here’s how.

To hide a file or a folder completely on Mac OS X you need to set the “hidden” attribute for it.

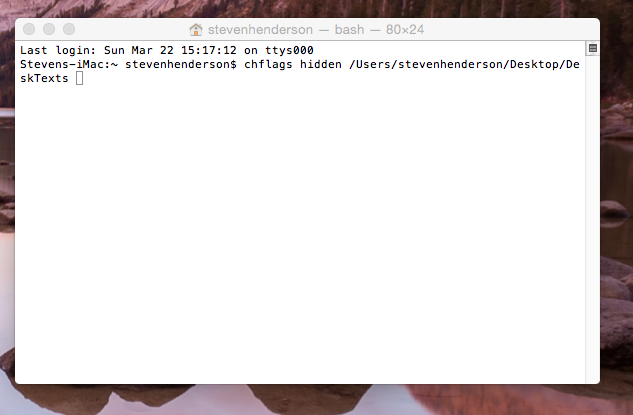
Open Terminal by typing Cmd + the Space bar and in the Spotlight Search window type Terminal and press Enter. When Terminal appears type the following command: chflags hidden followed by a space. Now drag-and-drop a file or folder that you want to hide from the Finder into the Terminal window.

The path of the folder or file that you just pulled into the Terminal will appear in its place so copy this path to your clipboard before you press the Enter key. Now press the Enter key and the file or folder will disappear.

DragFolder IntoTerminal

To get access to the folder, open Finder or click your Desktop so that the Finder’s Menu is visible at the top lefthand corner of your screen and click open the Go tab then mouse down and click Go to Folder and type or paste the path of your hidden folder into the box that appears. The ~ stands for your user folder, so if you previously hid a folder named Confidential that was on your desktop, you’d enter ~/Desktop/Confidential. The instant you hit Enter your hidden folder or file will appear. You can edit it any way you like and once you click it closed it will be hidden again so don’t forget its name and path.

GoToFolder

You might want to read my last post to learn how to password protect your hidden secret stuff on a Mac.

If you found any of this information idiotic or confusing, yell at me in the comments.

Advertisement

How to Password Protect Files on a Mac

08 Sunday Mar 2015

Posted by scoroncocolo in Uncategorized

≈ 2 Comments

Locking Up Sensitive Information on a Mac

In the post just before this one called How to Hack a Mac, I mentioned File Vault Encryption was about the only way that you could keep your Mac from being compromised by a anyone who gained physical access to it. In that post I pointed out that there were some downsides to File Vault Encryption and it is a far better option for most people to Encrypt one or two folders on their computers rather than locking down their entire Mac with File Vault Encryption. So let’s talk about how to do that.

There’s lots of third party software available in the Mac Store and elsewhere online to help you encrypt i.e. password protect your sensitive files. You can buy Secret Folder Pro for as little as $1.99. Or you can buy an even better encryption app called Concealer for $19.95 or even a fancier one that’s called Espionage for $29.95. But why pay money to gunk up your precious Mac with more non-Apple apps when you can encrypt or password protect folders yourself using software that’s already on your Mac.

The Geek Way to Encrypt Folders on a Mac

First of all we’re not going to just password protect a folder like you might do by right-clicking on one in Windows. Steve Jobs used to roll his eyes at that sort of Mickey Mouse way of half-ass doing things. No we’re Mac guys, so we’re going to create a password protected encrypted disk image (.dmg file) of a folder on our Mac that even Edward Snowden couldn’t hack into.

Ready? Let’s do this!

Go to your Mac’s Application folder (Shift + Cmd +A) and once there open Utilities and then open the Disk Utility program. Once in Disk Utility, click the File menu in the top left corner of your screen and select New and then click on Disk Image from Folder. Next, navigate to and click to select the folder or folders you want to password-protect and click the Image button.

In the next box that appears, choose a format for your folder/disk image. If you want it to be editable, choose Read/Write. Next, select an encryption level of either 128-bit or 256-bit. 128-bit is slightly less secure but takes less time to encrypt. After you’ve made your choices, click the Save button.

Password

Now you will be asked to provide a password so enter one and verify it. After that it’s very important to uncheck the box next to “Remember password in my keychain” because otherwise you or an intruder will not be asked for a password when opening the newly created password protected .dmg file image because OS X will automatically supply the password and you don’t want that so uncheck that box! Now click O.K. and your Mac will create an encrypted disk image of the folder in the form a .dmg file right where you specified or if you didn’t choose a location for it it will be placed in the same location as the folder you chose to encrypt.

To access your files just double-click the .dmg file and enter your password. This will cause a .dmg icon to appear on your Desktop (default location) which you can double-click to access your newly encrypted folder. You can add more files, delete files, copy them, edit them or re-arrange them or whatever. But once you’re finished working with the folder and want it to be password protected again you have to unmount it from Finder. Here’s how to do that: close the folder in the normal way and then click to highlight the disk image icon on your Desktop and in the menu bar at the top left corner of your screen click File and then click “Eject XXX” when XXX is the name of the disk image of your Folder. Or you can just right-click on the Desktop icon to eject it. But by all means, eject it to get rid of it otherwise anyone can come along and click it open and access all the files you intended to make private.

You will probably want to delete the original folder now that you have its contents safely locked away in a password protected encrypted disk image.

If you found any of this information idiotic or confusing, yell at me in the comments.

pageview

Recent Posts

  • A Bad Week for the GOP
  • Last Words of Famous People
  • Disable Windows 10 P2P Uploads
  • Windows 10 Keyboard Shortcuts
  • How to Get El Capitan on Your Mac

Recent Comments

facebook keyboard sh… on Creating Webpages with Ma…
Stewart on How to Hack a Mac and FileVaul…
Serena on The Exorcist Is Forty Years Ol…
xxx on How to Password Protect Files…
ทีเด็ดบอลเต็ง on The Exorcist Is Forty Years Ol…

Archives

  • April 2016
  • September 2015
  • August 2015
  • July 2015
  • May 2015
  • March 2015
  • February 2015
  • January 2015
  • December 2014
  • January 2014
  • November 2013
  • October 2013

Categories

  • In the News
  • Satire
  • Tech
  • Uncategorized

Info

  • Register
  • Log in
  • Entries feed
  • Comments feed
  • WordPress.com

Follow me on Twitter

My Tweets

Blogs I Follow

  • The Newswatch Television Official Blog
  • My Website / Blog
  • Ray Ferrer - Emotion on Canvas
  • Scoroncocolo's News and Reviews

Blog at WordPress.com.

The Newswatch Television Official Blog

Telling America's Story for Over 20 Years

My Website / Blog

Ray Ferrer - Emotion on Canvas

** OFFICIAL Site of Artist Ray Ferrer **

Scoroncocolo's News and Reviews

News, Opinions, Tech News and Reviews

Privacy & Cookies: This site uses cookies. By continuing to use this website, you agree to their use.
To find out more, including how to control cookies, see here: Cookie Policy
  • Follow Following
    • Scoroncocolo's News and Reviews
    • Already have a WordPress.com account? Log in now.
    • Scoroncocolo's News and Reviews
    • Customize
    • Follow Following
    • Sign up
    • Log in
    • Report this content
    • View site in Reader
    • Manage subscriptions
    • Collapse this bar
 

Loading Comments...