A Bad Week for the GOP

 A Bad Week For Republicans

Last week was a bad one for Republicans for a number of reasons. Let’s start with the fact that their presumptive presidential nominee has scared the bejesus out of some of our allies by suggesting that the U.S. military would be withdrawn from Japan and South Korea.

On April Fools Day two Gallup polls were published that must have been disconcerting to the GOP one demonstrated that their presidential frontrunner’s favorability percentage among women is tanking and another showed that the number of people aligning with the Democratic Party was as high as it’s been since December 2012. And the third bad thing that happened this week to the GOP was the fact that The Bureau of Labor Statistics reported this morning that the U.S. economy added 215,000 jobs in March making March the 66th consecutive month of positive job growth – the best stretch since 1939.

And speaking of the Republican Party’s frontrunner, here’s how Donald Trump would fare against Hillary Clinton were the election to be held today.

TrumpVsClinton

  • Steven Jay Henderson 4/2/2016

Last Words of Famous People

I thought this would be a fun if somewhat macabre way to kill off some bandwidth on my WordPress site. After all, Halloween is just around the corner right? The dying words of some of these famous people strike me as either peculiar, ironic or in some cases down right funny.

Elvis

Elvis Presley’s final words before his death in 1977 were, “I’m going to the bathroom to read.”

SteveJobs5

According to Steve Jobs’ sister Mona, the Apple founder’s last words were, “Oh wow. Oh wow. Oh wow.”

BuddyRich

The great jazz drummer Buddy Rich died during surgery in 1987. As he was being prepped for that surgery, a nurse asked him, “Is there anything you can’t take?” Rich replied, “Yeah, country music.” Greatest drummer of all time http://bit.ly/1Q7v1KG

Johnny_Ace_photo

R&B singer Johnny Ace died of a gunshot wound to the head in 1954 while playing with a pistol during a break in his concert set. His last words were, ‘It’s okay! Gun’s not loaded… see?’ Pledging My Love http://bit.ly/1Q7u84L

LadyAstor

When she woke briefly during her last illness and found all her family around her bedside, Lady Nancy Astor asked “Am I dying or is this my birthday?”

JamesWRogers

James W. Rodgers was sentenced to death by the state of Utah for murder in 1957. He was asked if he had any final requests before his execution by firing squad Rodgers replied: “Yeah, a bulletproof vest.”

TallulahBankhead

Tallulah Bankhead who died in NY at age 66 in 1968 was asked quietly on her death bed by a nurse if there was anything she wanted and she answered: “Codeine … bourbon.”

Vespasian

Roman Emperor Vespasian died in 79 AD. He was wise enough to consider the idea of Emperors being deified upon their deaths to be ridiculous. His last words were: “Oh My! I think I’m turning into a god.”

oscar-wilde

Oscar Wilde, ever the dandified critic of fashion and art is said to have uttered these last words after having been carried into an unfamiliar room: “Either that wallpaper goes, or I do.”

death-of-gen-john-sedgwick

U.S. Civil War General John Sedgwick killed by a sharpshooter at the Battle of Spotsylvania Court House on May 9th 1864 is remembered for his ironic last words: “They couldn’t hit an elephant at this distan….”

100-500px-Lively

Garth

ShoweringDogWhataShot

BLRv6mF - Imgur


batphone-jeb

giphy

Trump.gif

Enter a caption

Disable Windows 10 P2P Uploads

If you’re new to Windows 10 there’s something you need to change right away. By default Microsoft is using your PC to update other Windows 10 installations all over the Internet. Your copy of Windows 10 comes pre-programmed to act as a sort of server to deliver Bit-Torrent like P2P (peer-to-peer) uploads of Windows Updates that are already safely installed on your machine to countless people scattered all over the Internet that you don’t even know.

While this sneaky, underhanded, deceitful and despicable practice saves Microsoft billions of Gigabites of server bandwidth, it undoubtedly slows down your computer. More importantly, it eats into your upload bandwidth which means it slows your Wi-Fi connection to the Internet.

Fortunately you can change this horrible default behavior.

Win10_1

Open the Start Menu and click Settings and then click on Update & security.

Win10_2

In the next window, with Windows Update highlighted in the upper left corner, click on Advanced options.

Win10_3
In the next window that appears, click on Choose how updates are delivered.

Win10_4

Finally, you get to the window that lets you disable the option to have your PC act as a botnet host in Microsoft’s P2P Torrent scheme. There’s nothing wrong with using Microsoft’s peer to peer uploading scheme to host the other PC’s on your Wi-Fi network so change it to that option or turn it off entirely and get your Windows updates the old-fashioned way. Just make sure you change from the default setting.

If you found any of this information idiotic or confusing, yell at me in the comments.

Windows 10 Keyboard Shortcuts

Windows 10 Task View

One of the coolest ways to get acquainted with the snazzy new features in Windows 10 is to dive right into the new Windows 10 keyboard shortcuts. The first new Windows 10 shortcut you need to start using is WinKey + Tab. This opens the new Task View feature in Windows 10. You can also open Task View with your mouse in Windows 10 by clicking on its icon. It’s the second button over from the new Windows 10 Start Button.

TaskViewButton

Task View is a wonderful addition to the new Windows 10 OS. It’s something that Microsoft should have provided its users long ago. Task View is very similar to OS X’s Mission Control which Mac users have had since 2003. It shows you and offers to let you interact with all of your open windows. Here’s what it looks like.

Windows10TaskView

Virtual Desktops

Finally, Windows is giving us something else Mac and Linux users have enjoyed for a long time and that is Virtual Desktops. You can make a new Virtual Desktop for yourself whether you’re in Task View mode or not by using the keyboard shortcut WinKey + Ctrl + D or if you are in Task View mode you can just click on the New desktop X at the lower right of the screen.

NewDesktop

You can create as many Virtual Desktops (some call them work spaces) as you like. You can see an icon of them in the horizontal bar beneath all your open windows while you’re in Task View mode. You can click on an icon to move to that Desktop.  Or, whether you are in Task View mode or not you can move between Desktops with the keyboard shortcut WinKey + Ctrl + ArrowKey  left or right.

Win10NewDesktop

Snap Assist

Another feature in Windows 10 that people are talking about is Snap Assist that lets you quickly snap two windows together full screen so that you can compare them and interact between them. Of course this is not something that is altogether new. Both Windows 7 and Windows 8 had something similar to Snap Assist. But in those older OS’s you could snap a window to the left or right of your screen but you would have to manually go hunting for a partner window to fill the other side of the screen. In Windows 10, if you snap a window to the left or right side of your screen, Windows will display all of your open (active) applications (windows) in Task View mode so you can click on one to choose it to be the second half of the screen.

Win10SnapAssist

In Windows 10 there are two ways to navigate into Snap Assist mode. You can grab a window by its title bar and drag it to the left or right so far that it half-screens itself or you can use the keyboard shortcut WinKey + Arrow left or right. Either way the window will be full-sized on half the screen and all other open windows will be offered as candidates to partner on its other side.

How to Get El Capitan on Your Mac

How to Download El Capitan Public Beta

Apple’s newest Mac operating system El Capitan OS X 10. 11 won’t officially be released to the general public until sometime in the middle of this coming fall but you can download and install it now for free and here’s how.

You’ll first need to sign up for the Apple Beta Software Program and then download El Cap from the App Store just as if it were any other software. And no. It won’t automatically install after downloading and ruin your copy of Yosemite or Mavericks. The download will sit peacefully in your Applications folder until you launch it and tell it where to install.

DownloadElCap

If you’re like me you use Chrome on your Mac instead of Safari. But you’ll need to use Safari to sign up for and download El Capitan.

How to Install EL Cap on a Separate Partition of Your Mac

You could install El Cap on virtual machine software. I have Windows 10 running on Virtual Box on my Mac but OS X just seems to run better on a raw Mac than it does in VM software so unless you have an old Mac sitting around that you no longer depend on for your daily use that you could install it on, you’d be better off putting El Capitan on a different partition of your Hard Drive than you have your main operating system installed on.

Partition

So hit CMD + Spacebar to bring up Spotlight Search an type in Disk Utility and click it open.

Click on Macintosh HD to highlight it and then click on Partition and then click the + button and use the slider to create a smaller area beneath your main partition.

PartitionMac

El Cap is 6 gigs so make your new partition at least twice that and then give your new partition a name like El Capitan and click Apply. Give your Mac time to make the new partition. It may take several minutes. Once the process completes close Disk Utility.

Installing El Cap on the New Partition

If you’ve downloaded El Capitan from the App Store as per instructions at the top of this post, your copy of the new OS X will be in your Applications folder. Find it and click on it to launch it.

Don’t worry when you launch El Cap you’ll be asked where you want the installation to take place. See below images. But first you’ll have to take care of the legaleze as in TOS agreements so accept all that and you’ll be asked for your Administrator password and later you’ll need your Apple username and password. And finally you’ll get to the Install OS X screen so you’ll want to click on Show All Disks to get to the screen that shows your El Capitan partition so click on that to highlight it and click Install.

show-all-disks-for-installing-os-x-10-11

select-drive-to-install-os-x-el-capitan-to-mac

When you downloaded El Cap from the App Store, it should have taken an hour to an hour and a half depending on your Internet connection speed. The installation part will take around 30 minutes.

Once it’s done you’ll need to follow the Wizard. It’s just like setting up a brand new Mac. The Mac will reboot at least once maybe twice. You’ll see some spinning beachballs but eventually you’ll suddenly be presented with that stunningly beautiful El Capitan desktop.

Congratulations! You’re running OS X 10.11

To get back and forth between partitions, just hold down the OPT key as you re-boot your Mac to get to the Startup Manager. use your mouse or arrow keys to indicate which partition you want to boot to and hit enter.

If you found any of this information idiotic or confusing, yell at me in the comments.

Unlock Your Mac with Your iPhone Using MacID

Unlock Your Mac with Your iPhone Using MacID

A long complicated password plus two-factor authentication can make your Mac almost impossible to hack into. That’s what you get with MacID. MacID lets you open your Mac from a sleeping state by using the fingerprint sensor on your iPhone and/or Apple Watch. It also uses Bluetooth to automatically put your Mac to sleep the moment you walk away from your computer.

If you’re the least bit concerned about security, you’re going to love MacID. Because since you now can open your Mac with a fingerprint scan as easily as you open your iPhone, you can afford to start using long, complicated passwords without having to actually bother with physically typing that password in to wake-up your Mac. You also have the added safety of what security experts call common tokens it this case your iPhone or Apple Watch plus your password for two-factor authentication.

The Utter Coolness of MacID

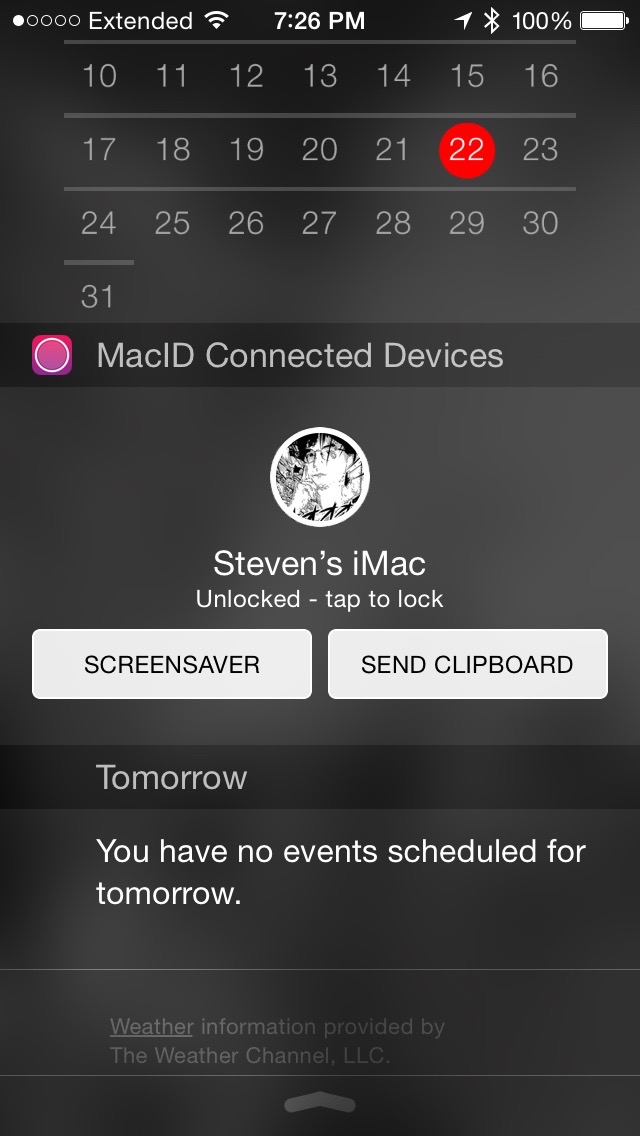
You can use MacID to unlock your Mac without even having to first open your iPhone. After you have MacID up and running, open settings on your iPhone and go to Notifications and look for MacID and make sure its Allow Notifications button is activated. And then from now on even on your unlocked phone just swipe down to reveal Notifications and you’ll see this.

MacIDnotifications
The iPhone Notification Mode for MacID

You can share clipboard info back and forth between iOS and OS X. In the illustration above you’ll see a Send Clipboard. If you tap that, whatever text you have copied to your clipboard on your iPhone will be placed on your Mac’s clipboard as well. To send clipboard info from your Mac to your iPhone, just click on the MacID icon in your Mac’s menu bar and click “Send Copied Text to iOS Clipboard”. More about that later.

SendTextToPhone

MacID includes a handy Notification Center widget, which will show all your currently connected Macs and give you quick access to lock and unlock them from anywhere on your iOS device. You can even start a Mac’s screensaver or share the clipboard right from the Notification Center meaning you don’t even have to open the MacID app to do almost all of what MacID can do.

You can also use MacID to play, pause and skip iTunes and Spotify music on your Mac remotely, as well as change the volume. You just need to tap and hold on the audio controls to toggle between forward/backward and volume controls.

Copy something to the clipboard on your iPhone and then open your iPhone’s MacID app and double-tap the Mac you want to send the text to. Bam! It’s now on that Mac’s clipboard ready to be pasted into any place you choose. You can also accomplish this by swiping down from the top of your phone to open Notifications.

Twitter may limit you to 140 characters but you can transfer 4,000 characters with MacID

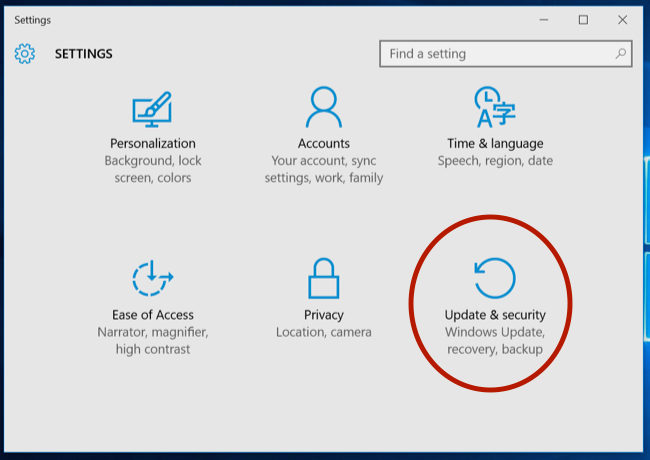
MacID will cost you $3.99. Your Mac must be running Yosemite or later and your iPhone must be a 5S or newer running iOS 8 or later. Bluetooth must be enabled on the devices you wish to use. Your Mac must support Bluetooth LE (Low Energy) as most newer Macs do. To make sure your Mac supports Bluetooth LE go to Apple menu > About This Mac > System Report > Bluetooth.

Setting Up MacID

You can get MacID for OS X Yosemite here Just make sure you have Gatekeeper set to allow apps from outside the Mac App Store.

You can get MacID for your iPhone here or just look for it the way you search for and get all your other iPhone apps because it’s in the App Store on the iOS side of things even though it isn’t available in the Mac app store for some reason.

After you have installed MacID on your iPhone and Mac/Macs, you need to pair your devices. To simplify matters lets assume you are setting up MacID on one iPhone and one Mac so open MacID on both your devices.

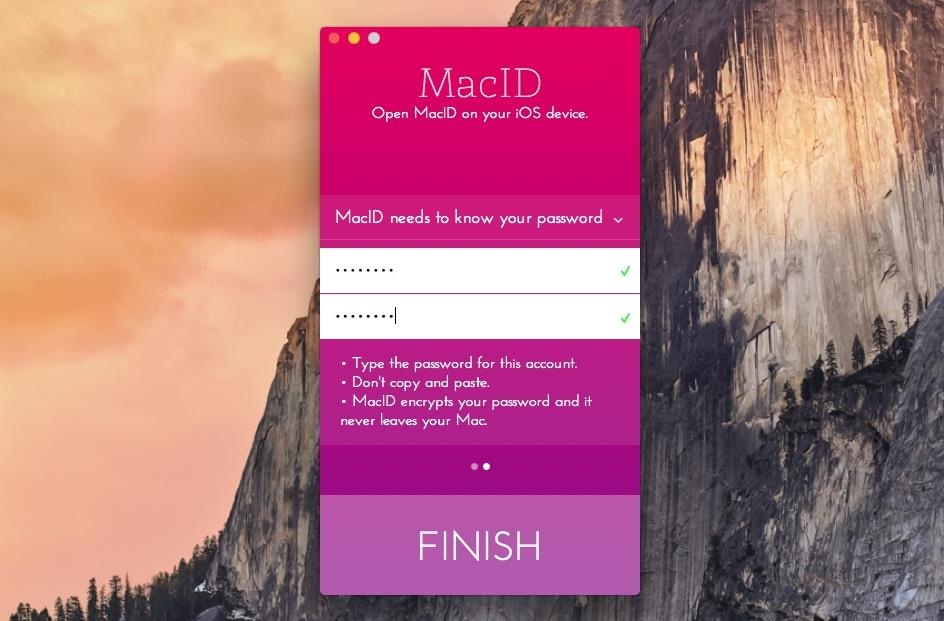
On your Mac, the MacID app will use Bluetooth to search for your iPhone. Once you see your phone appear in the app on your Mac, click on it. It will ask you to enter the password you normally use to unlock your Mac so type that in and confirm it and click FINISH. From now on you can use your iPhone’s Touch ID or your password to unlock your Mac.

MacIDfinish

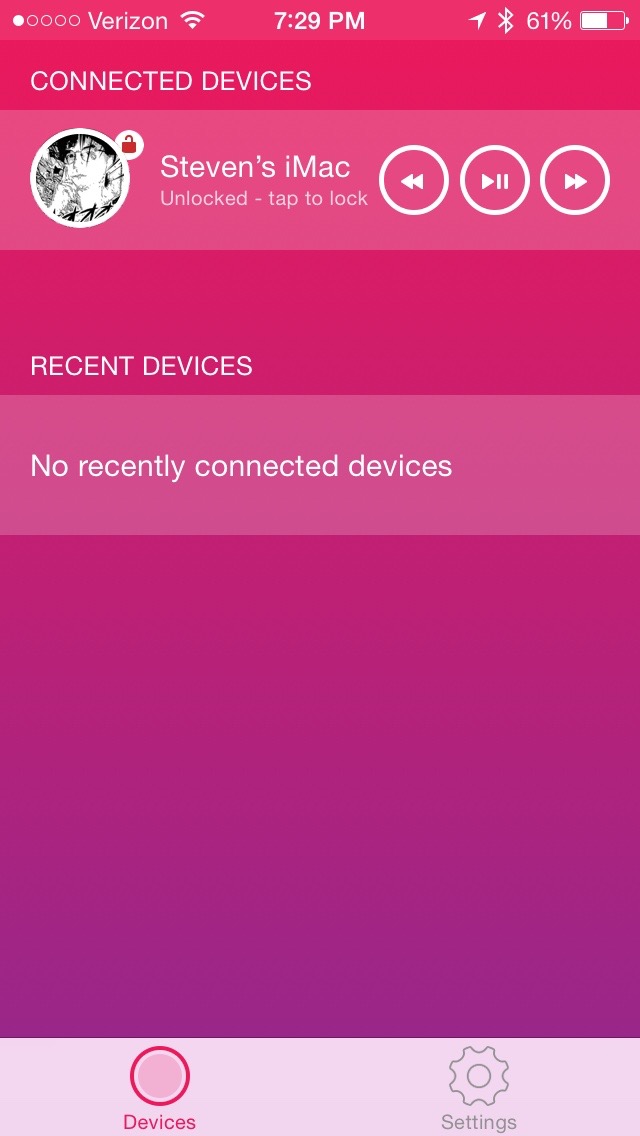
Now on the MacID app open on your iPhone you should see your Mac under the heading of Connected Devices much like on the illustration shown below. Notice the padlock next to your log-on pic. If your Mac is awake it’s unlocked. It will appear locked if your Mac is asleep. Just tap it to unlock your Mac if it’s sleeping and if your Mac is awake, tapping your log-on pic on the iPhone app will instantly put your Mac to sleep. Notice also the pause/play forward/reverse icons. These allow you to interact with iTunes or Spotify if somewhat clumsily.

MacIDconnectedDevices

Once you have MacID up and running on your iPhone, you can open the app up and tap on Settings to among other things disable the audio controls. In Settings you can also change the color scheme from pink to gray. You can also stop your device from being discoverable, and disable Touch ID, both of which seems to me to defeats the purpose of spending money to buy the app in the first place.

MacID on your iPhone has quite a bit of functionality. You can swipe right and left to offer you things like sleep mode or screen saver mode. But by far the coolest thing is that MacID can transfer text that you’ve copied to your clipboard on your iPhone over to your Mac. To do that you just long-press on your iOS icon and tap on Send Text to Mac Clipboard and it’s done instantly.

MacID also allows you to transfer clipboard text from your Mac to your iPhone. To do that, copy some text to your Mac’s clipboard and then click on the MacID icon in the Mac menu bar and then click Send copied text to iOS clipboard and BAM! it’s done.

I think MacID is one of the coolest implementations of Touch ID which is one of Apple’s most momentous innovations. If you’ve got a Mac and an iPhone and you’re not using MacID, you’re missing out on a lot of geeky, fun, coolness.

If you found any of this information idiotic or confusing, yell at me in the comments.

Wired Magazine’s Expose on Silk Road

Wired Magazine’s Expose on Silk Road

silkroad

Today the online Magazine “Wired” published part two of its expose on the rise and fall of Silk Road, the Amazon dot com for drugs and all sorts of contraband that the Feds took down in 2013. The Dread Pirate Roberts, Silk Road’s genius amateur coder and inventor turned out to be Ross William Ulbricht a clean-cut Texas kid from a well-to-do Austin area family. Silk Road was operated as a Tor hidden service, such that online users were able to browse it anonymously and securely without potential traffic monitoring. Here’s the link to Part Two of this fascinating story. You can find a link there for Part One. So start at the beginning. It will definitely hold your attention.

How to Hide Files and Folders on a Mac

In the last post I wrote about how to encrypt files and folders on a Mac in order to be able to password protect them. In this post I want to talk about where might be the best place to hide them first of all and finally I want to show you how to make them disappear entirely.

Hiding Files in the Library Folder

Your Mac’c Library folder is similar to the Registry in Windows and is hidden by default. It’s hidden so that people are less likely to move, delete or deface system files but otherwise it is just like any other folder in OS X so you can certainly add other folders and files there. So as long as you are careful, it’s fairly good place to hide some secret stuff.

To find the Library folder in Mavericks and Yosemite, go to your Home folder in Finder (Shift + Cmd + H) or look for Home in Finder’s Go tab in the Finder menu bar. When in your Home Folder click View then click Show View Options or type (Cmd + J). When the View Options window opens, you’ll see a box at the bottom you can check to Show Library Folder. See below illustration. Enable that and your Library Folder appears. Now you can double-click it open and start dragging your secret stuff into it.

HideFiles inLibrary

Another way to get to the Library Folder is to hold down the Option Key while clicking the Go tab in Finders. This will give you the option to click open your Library Folder whether you have it hidden in your Home Folder or not.

It’s perfectly safe to add all the stuff you want to the Library Folder just don’t alter or delete anything that’s already there . When you’re done you can make the Library Folder hidden again by un-checking the Show Library Folder box.

The Most Secure Way to Hide Stuff on a Mac

While the above method of hiding files on a Mac might be geeky enough to secure things from your snoopy little brother, most tech savvy snoops could possibly find your secret stash if you tried to hid it in the OS X Library Folder so here’s a far more secure way to secret stuff on a Mac

In fact, it’s a way to hid folders and files on your Mac that is so secure that even Edward Snowden couldn’t find them. Here’s how.

To hide a file or a folder completely on Mac OS X you need to set the “hidden” attribute for it.

Open Terminal by typing Cmd + the Space bar and in the Spotlight Search window type Terminal and press Enter. When Terminal appears type the following command: chflags hidden followed by a space. Now drag-and-drop a file or folder that you want to hide from the Finder into the Terminal window.

The path of the folder or file that you just pulled into the Terminal will appear in its place so copy this path to your clipboard before you press the Enter key. Now press the Enter key and the file or folder will disappear.

DragFolder IntoTerminal

To get access to the folder, open Finder or click your Desktop so that the Finder’s Menu is visible at the top lefthand corner of your screen and click open the Go tab then mouse down and click Go to Folder and type or paste the path of your hidden folder into the box that appears. The ~ stands for your user folder, so if you previously hid a folder named Confidential that was on your desktop, you’d enter ~/Desktop/Confidential. The instant you hit Enter your hidden folder or file will appear. You can edit it any way you like and once you click it closed it will be hidden again so don’t forget its name and path.

GoToFolder

You might want to read my last post to learn how to password protect your hidden secret stuff on a Mac.

If you found any of this information idiotic or confusing, yell at me in the comments.

How to Password Protect Files on a Mac

Locking Up Sensitive Information on a Mac

In the post just before this one called How to Hack a Mac, I mentioned File Vault Encryption was about the only way that you could keep your Mac from being compromised by a anyone who gained physical access to it. In that post I pointed out that there were some downsides to File Vault Encryption and it is a far better option for most people to Encrypt one or two folders on their computers rather than locking down their entire Mac with File Vault Encryption. So let’s talk about how to do that.

There’s lots of third party software available in the Mac Store and elsewhere online to help you encrypt i.e. password protect your sensitive files. You can buy Secret Folder Pro for as little as $1.99. Or you can buy an even better encryption app called Concealer for $19.95 or even a fancier one that’s called Espionage for $29.95. But why pay money to gunk up your precious Mac with more non-Apple apps when you can encrypt or password protect folders yourself using software that’s already on your Mac.

The Geek Way to Encrypt Folders on a Mac

First of all we’re not going to just password protect a folder like you might do by right-clicking on one in Windows. Steve Jobs used to roll his eyes at that sort of Mickey Mouse way of half-ass doing things. No we’re Mac guys, so we’re going to create a password protected encrypted disk image (.dmg file) of a folder on our Mac that even Edward Snowden couldn’t hack into.

Ready? Let’s do this!

Go to your Mac’s Application folder (Shift + Cmd +A) and once there open Utilities and then open the Disk Utility program. Once in Disk Utility, click the File menu in the top left corner of your screen and select New and then click on Disk Image from Folder. Next, navigate to and click to select the folder or folders you want to password-protect and click the Image button.

In the next box that appears, choose a format for your folder/disk image. If you want it to be editable, choose Read/Write. Next, select an encryption level of either 128-bit or 256-bit. 128-bit is slightly less secure but takes less time to encrypt. After you’ve made your choices, click the Save button.

Password

Now you will be asked to provide a password so enter one and verify it. After that it’s very important to uncheck the box next to “Remember password in my keychain” because otherwise you or an intruder will not be asked for a password when opening the newly created password protected .dmg file image because OS X will automatically supply the password and you don’t want that so uncheck that box! Now click O.K. and your Mac will create an encrypted disk image of the folder in the form a .dmg file right where you specified or if you didn’t choose a location for it it will be placed in the same location as the folder you chose to encrypt.

To access your files just double-click the .dmg file and enter your password. This will cause a .dmg icon to appear on your Desktop (default location) which you can double-click to access your newly encrypted folder. You can add more files, delete files, copy them, edit them or re-arrange them or whatever. But once you’re finished working with the folder and want it to be password protected again you have to unmount it from Finder. Here’s how to do that: close the folder in the normal way and then click to highlight the disk image icon on your Desktop and in the menu bar at the top left corner of your screen click File and then click “Eject XXX” when XXX is the name of the disk image of your Folder. Or you can just right-click on the Desktop icon to eject it. But by all means, eject it to get rid of it otherwise anyone can come along and click it open and access all the files you intended to make private.

You will probably want to delete the original folder now that you have its contents safely locked away in a password protected encrypted disk image.

If you found any of this information idiotic or confusing, yell at me in the comments.